

Windows 11 is the latest operating system from Microsoft. While everyone is excited about trying it out, not all PCs and laptops are supported for Windows 11 installation or upgrade. Windows 11 requires that you have an 8th Gen or newer Intel processor and also TPM 2.0. But what if you do not have those? Let’s find out how we can upgrade or install Windows 11 on unsupported PCs and hardware.
Also Read: Will your PC run Windows 11? Find out how.
Download Windows 11 ISO.
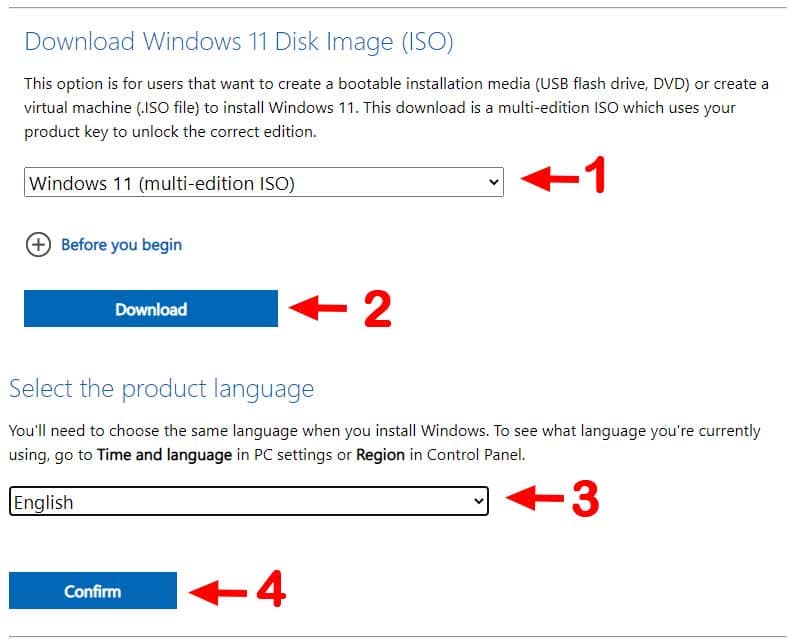
To install Windows 11, first, download the Windows 11 ISO from Microsoft’s official site. On the website scroll down to the bottom option where it says “Download Windows 11 Disk Image(ISO), then choose “Windows 11 (multi-edition ISO)” where it asks you to “Select Download”, then choose your preferred Language, confirm it and click on “Download”.

Method 1. Create a Windows 11 Bootable USB Drive using Rufus
The easiest way to install Windows 11 on unsupported PCs is by creating a Bootable USB drive is using Rufus tool that can bypass hardware checks. Rufus is an open-source tool to create bootable USB devices for various Operating systems including Windows 11 available in the latest version of the tool.
- First download Rufus tool and run it.
- Insert the USB drive to your computer.
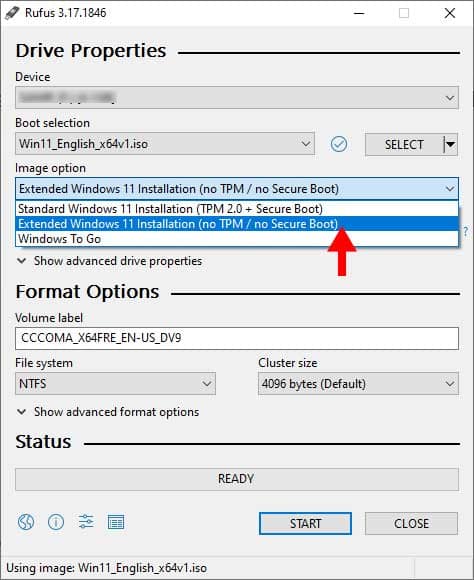
- Press on SELECT to choose your ISO file for windows 11 that you just downloaded. Choose the ISO image.
- Next, under Image option, make sure you choose Extended Windows 11 Installation (no TPM/no Secure Boot)
- Press Start button and the Rufus tool will start to create the Windows 11 Bootable USB disk for you.

After finishing, you can boot from the newly created Windows 11 bootable drive to boot into clean installation or browse the drive to upgrade in any unsupported PC.
Also Read: How to Create MultiBoot USB Drive with Ventoy – The Easy Way
Method 2. Edit or Replace appraiserres.dll File
This method involves editing or replacing a DLL file that is present inside Windows 11 installation files.
- After you have downloaded the Windows 11 ISO image, extract it.
- Inside te extracted folder, go into sources folder and find a file called appraiserres.dll.
- Create a backup of that file somewhere or just make a copy and rename the copy as appraiserres.dll.bak.
- Now you can either delete the original file or edit it so that the setup process does not try to cross check the compatibility. If you have deleted the file then you can skip the next step and run setup.
- Right click appraiserres.dll and open it with notepad.
- Press F3 to pop up the find dialogue box in notepad. Search for tpm.
- Delete everyline that includes the word tpm. Keep hitting F3 to find the next word in the file and delete until you are all done.
- Save it finally and run setup.
If these steps are confusing to you, just download the DLL file I have provided down below. Extract and find appraiserres.dll file inside and replace it with the one in the downloaded file.
Final Words
In short, these are the easy methods that you can use to install the new Windows 11 on your unsupported system. In my personal experience, I have tested both methods, and are working for me. If you do not want any hassle and just need it to be done quickly, follow the first method as it is the easiest one and needs only a few clicks on Rufus tools.


")


