

Gone are the days when computers usually had optical drives. Optical drives were a convenient medium for fresh Operating system installations. As those optical drives fade out, users have now resorted to using bootable USB drives to do the job. Lets deep dive into how we can create a Bootable USB Drive for Windows without any external tools.
[Disclaimer: There are a lot of different third party tools that can create bootable drives like Rufus or Microsoft’s in-house tool called Media Creation Tool. This post is intended for the purpose of learning what happens behind the scene and what really is going on.]
Choosing and Preparing USB Drive
USB drives need to have enough space to store the installation files of the selected version of windows. Depending on the size, choose your USB drive. It is recommended to have a USB drive with 8GB of storage. I am also using 8GB USB drive for the tutorial.
- Plug in your USB drive to your computer that you wish to use.
- Run CMD (Command Line) as an administrator. To run CMD as an administrator, press Start and type cmd, right click cmd and click Run as administrator.
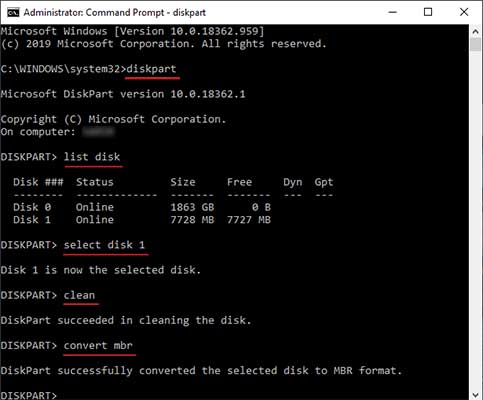
- Run diskpart by typing “diskpart” in cmd. Diskpart is a built-in command line tool inside windows to manage partitions in a drive.
- Once diskpart is running, type “list disk”, this will list all the disks that are active and connected.
- Select the USB disk, which in our case is Disk 1. Type “select disk 1”. This will select the disk and the further commands will impact only the selected disk.
- Next, type “clean”. Be careful though, this command will completely erase/format your selected drive. So, backup anything important in the drive before you do this. Wait for the prompt that says “Diskpart succeeded in cleaning the disk”.
- Now, convert the selected disk to MBR by typing “convert mbr”;
OR
convert the selected disk to GPT by typing “convert gpt”. (Note: Older systems with legacy bios need MBR partition, whereas the newer devices that support UEFI non-CSM will require GPT partition.)
OR

Creating Partitions and Formatting
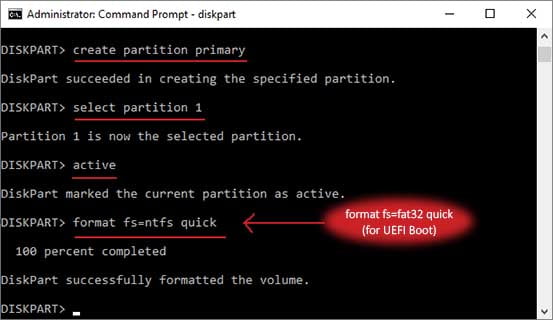
- Type “create partition primary” to create partition into your newly cleaned drive.
- Type “select partition 1” to select the partition you just created.
- Type “active” and hit Enter. This marks the partition as active partition in the drive.
- Format the partition as NTFS by typing “format fs=ntfs quick”
OR
format the partition as FAT32 by typing “format fs=fat32 quick” if you wish to UEFI Boot. - Exit diskpart utility by typing “exit”.
Writing Boot Sector
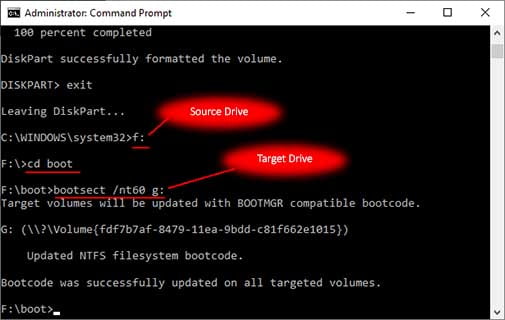
In order to make the drive bootable, we need to write the boot sector from the existing bootable(installation) media, that may be an ISO image or a physical optical media (CD/DVD) to the USB drive.
- Mount your ISO image by right clicking and selecting “Mount” option. This will mount the ISO image as a virtual drive in your system. Or, insert your CD/DVD to your optical drive.

- In CMD window, navigate to the installation media. In my case, the USB drive is G drive and the installation media is in F drive. So, I navigate to F drive by typing “f:”.
- Type “cd boot” to change active directory to boot inside Y drive. The prompt should now look like F:\boot>
- Type “bootsect /nt60 g:” , This creates a boot sector in x drive or your USB drive.
- Copy entire files contents from installation media to USB drive.
Additional Steps for UEFI Boot – Adding UEFI:NTFS drivers
- Download the latest UEFI:NTFS file system drivers from here.
- Extract the file named uefi-ntfs.img and copy the file content to your USB drive. You can use 7-zip to extract the files from .img file.
That is all, your bootable USB drive is ready to be used for windows installations.


